Serving Southern Arizona Since 2003
Call (520) 406-5900

Author: Service Lifter

Choosing Paint Colors for Your Tucson Home


Welcome to the Color Selection of the AA Brite 24/7 web page. Here you will find recent information on how to select colors for interior painting of your home or business. As you are aware color selection can range from following simple rules to being complex. One can even spend four years studying it at a college to get a degree. Obviously this web page will not be the four year version of color selection, but it will illustrate the basics as well as provide alternate paths to aquire great colors.

Paint Color Wheel

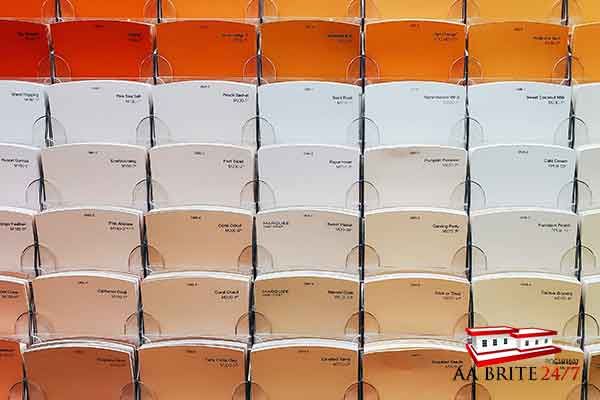
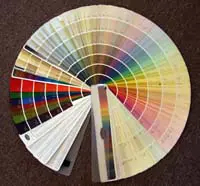
The photo above is of a Dunn Edwards fan deck which has been opened up and fanned out. Typically there would only be one or a few pages sticking out at any given time. There are over 1,000 colors shown in this particular fan deck. The photo below is a section on understanding color, using a page from this fan deck as an example.

Understanding Coloring – Per Page
The image below shows a fairly popular page out of the fan deck. I’ve numbered the colors from 1 to 7 to aid in explaining how these colors were formulated. Color #1 Tea Biscuit is made by taking raw uncolored paint called “base” and adding some tint to it. The person at the store mixing the paint will look up this color in the computer and add a certain number of ounces of colored tint to this base to get this color. Color #2 is made with the same color tint, but a little more of it is put into the raw paint. Colors 3 through 7 are made by adding more and more of the same color tint. Color #7 is the closest to the actual color of the tint being put into the raw paint.

Paint Color Card

So for conversational purposes, paint in color #1 was made by adding a few drops of tint to the raw paint. Color #7 used the same color tint but took a whole lot of it. In other words do you like your chocolate milk almost white, medium or do you take it as syrup with a drop of milk added? It’s the same with paint, and it goes from light color to progressively darker on each page of the fan deck.

Why does staying on the same page matter?

Great question, and there is a good answer. If you are a genius with color or “color stupid” (no offense meant) you can’t go wrong with painting your house with colors from this method, even if you use a different page from the fan deck, so long as all colors are chosen on the same page. They all go together because in a way they are all the same color. Any combination of colors from one through seven will coordinate. For example color #1 could be used on the ceiling, color #3 on the walls, and an accent wall could be #6. This method of matching paint colors is easy and hassle free. Plus you needn’t be anxious about what others might say regarding colors being compatible or not, as they are coordinated through the use of one tint.

What colors should I pick?

Now we are getting into the more difficult questions, but there are still guideposts. In Tucson tans and beiges are popular as they are soft and neutral. Which tan or beige? Interiors with high ceilings and lots of light can handle the darker shades while smaller and darker homes or offices need lighter colored paint. When I do the bid for you I’ll be happy to recommend conservative colors and show you where accent walls can be. If you’re looking for a high end color scheme that coordinates with furniture and uses different colors throughout the house then please read the interior decorator section. They are much more affordable than you might imagine ($100 – $150).

Popular Paint Store Brochures

If you want to pick colors that will not be on the same page of a typical fan deck and you’re not comfortable going it alone, then a safe, inexpensive and popular option is a paint store brochure which has pallets of colors picked by professional decorators. Just find a color pallet you like and rest assured the various colors on the pallet go together even though they are on different pages in the standard fan deck.

Paint Color Brochure

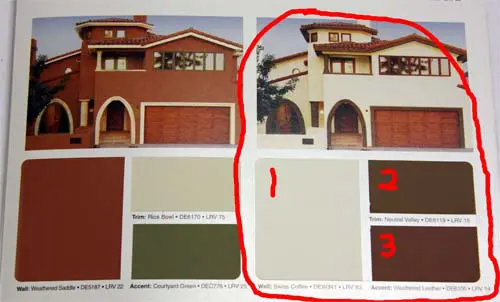
The section circled in the photo is from a Dunn Edwards brochure called “Spanish Mediterranean”. This brochure is popular and has good colors in it for Tucson. If you like the look of one of the twelve homes in the brochure then you have your three colors. Yes, this is an exterior brochure but I’ve circled a popular choice for interiors as an example of how it works.

Paint Color Brochure

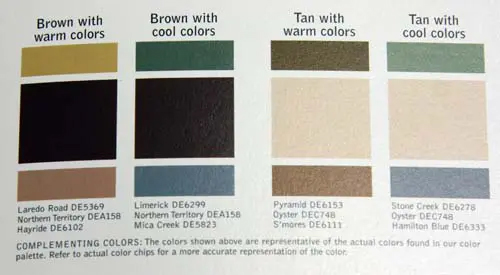
Pick one of the four sections and you have your three colors.

Don’t trust your computer monitor

You probably know this, but don’t trust any colors you see on your computer monitor. Every monitor looks different. The above colors might look great on one monitor and terrible on the next. The right way is to look at the brochure in person and then get it sampled. The photos were included to aid your understanding of how the process works, not to be technically accurate representations of the paint colors.

Accent Walls

Accent walls are typically darker in color. The safe way to do it is to paint, for example, a lighter color such as #2 on the walls and then use a darker color off of the same page in the fan deck like #6 or #7 for the accent. It’s a certainty they will look great together if done this way. If you choose to pick an accent color from a different page of the fan deck then the most popular colors are reds and dark reds. They are elegant and really pop, and a shade of red is what my wife and the decorator decided on together for our home. A nicely decorated home with a red accent wall looks great.

AA Brite 24/7 Logo

Get a Quote for Roofing or Painting Today!
Call (520) 406-5900

Get a Free Estimate!

More Painting Tips


Continue reading

The 6 Most Popular Types of Stucco Finishes


AA Brite 24/7 is located in Tucson, Arizona, and we put local exterior stucco into one of six categories:

The six most common types of exterior stucco include:

  1. Smooth Stucco Texture
  2. Sanded Stucco Texture
  3. Sprayed Cement Stucco
  4. Spanish Lace Stucco
  5. Tex Coating Stucco
  6. Synthetic Sprayed Stucco

Variations Within the Categories

Within each of these categories, there will be quite a bit of variation in workmanship, which affects the look and also the likelihood that patches can be applied without looking like patches. As another contractor I know says, “Great original stucco workmanship is easy to patch and paint; poor workmanship is a pain forever more.”

1) Smooth Stucco Texture

Advantages: Considered the most elegant looking by many people

Disadvantages: The walls almost always end up wavy with the framing and Styrofoam showing through. Cracks are difficult to repair and highly visible. Many of the cracks will be horizontal or vertical, which means two things. A) The stucco isn’t the problem; something under the stucco is moving and causing the crack. And. B) The crack is coming back.
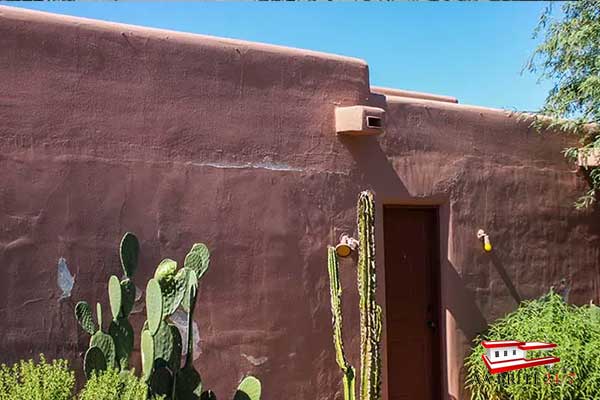
Smooth Stucco Texture

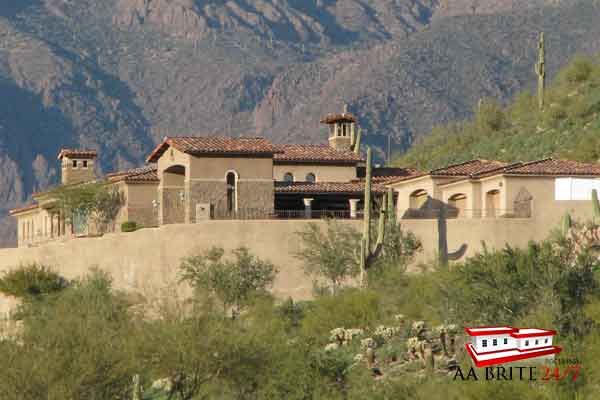
When well done, smooth stucco is often considered the most elegant looking. The mansion pictured on my main web page and below has a smooth stucco finish, and it looks great. However, smooth stucco comes at a price. The smoother and flatter a surface, the more it shows any defect or variation – and all walls have some waves and variations. Think of a shiny clean glass table with three grains of sand on it. The three grains of sand (read small defects) stand out so much because the table is smooth. It’s also the most difficult stucco to patch. Again think of trying to glue together a broken glass table without having any witness lines or scars, even after it’s painted. Though we repair it, it’s fairly difficult to do.
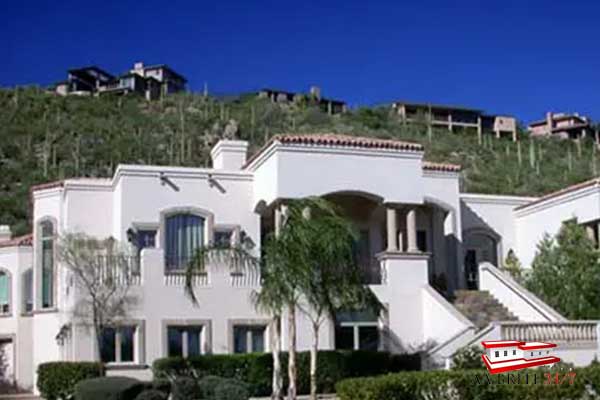
Smooth Stucco Texture

Well-done original flat stucco will only require minor crack repairs. With well-done stucco, the building will not look like a zebra when the prep work is finished, and it’s ready to be repainted since only a spot here or there was patched. As you slide down further in the quality of the original construction, the building will be more and more striped with repair work. When it looks like a zebra prior to painting, then some of the patchwork is going to show. For cases like this, there is only one other option, and that’s to re-stucco the exterior – which can cost ten to thirty thousand dollars.

[ Updated July 2nd, 2020] For the past ten years or so, I’ve had the smooth stucco information on my website. Since then, I’ve yet to see a single flat stucco house that didn’t have a lot of cracks in it. My opinion has changed some. I believe flat stucco homes can look great from a distance, but I don’t think one can stay looking great to a painter or anyone else with an eye for detail for over a year. They will crack, and if premium paint is used, they will all look wavy. If you have or know of non-cracked flat stucco that’s over a few years old, I’d love to hear from you and to see the house. I could write a book on this topic, but the number of flat stucco homes in my area is under one percent. If you need more information, please call me]
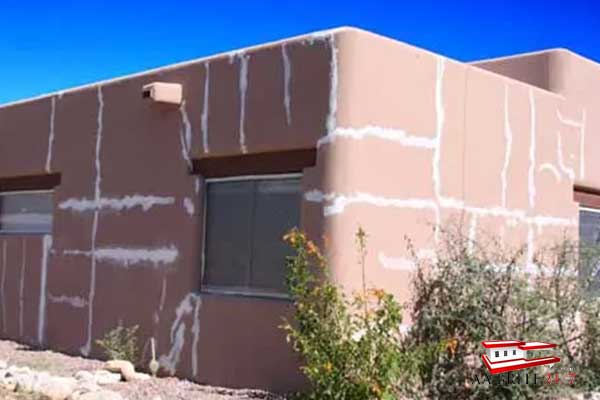
Smooth Stucco Texture Repaired

The photo above is of a home that could have been built better. It appears the foam backing is moving under the stucco, and there are quite a few waves. If a like-new finish is desired, then the correct answer is to entirely re-stucco the home. Since variations and defects are so visible on this stucco type, most builders avoid using it.

When cracks are perfectly horizontal or vertical, this is also an indication the materials under the stucco are moving. Cracks don’t naturally occur in straight lines. Looking at this picture, you can almost count the pieces of plywood and foam under the stucco – based on the way it’s cracking.

2) Sanded Stucco Texture

Advantages: Considered elegant looking and gives the home a soft feel.

Disadvantages: If there are air voids or the texture comes out sharp, it is difficult to patch.

Sanded stucco is much more common than smooth, and it’s a little more forgiving to work with. The texture created by the sand on the wall helps hide any waves or joints by camouflaging them. The key word being “helps.” Though it’s better than smooth from a repair point of view, it is still fairly difficult to patch without scars or spotting. Something working against whoever is doing the patching is the short height of the texture. Sanded stucco repairs are messed up by the inexperienced fairly frequently, with the most common mistake being caulk is applied directly to the crack and then left to dry as is. The resulting lines are called “scars,” and the big ones look terrible! See the Photo below of the homeowner’s repair.
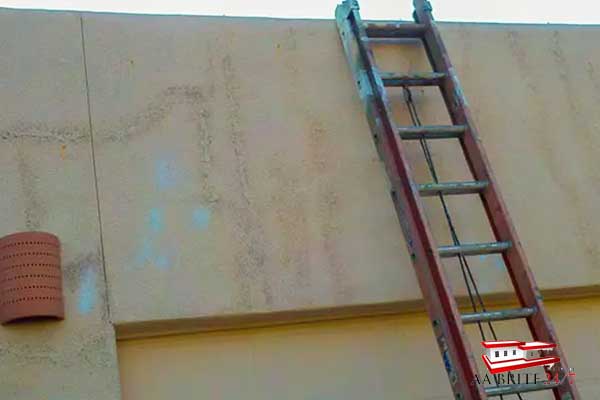
Sanded Stucco Scars

As a side note and according to my better half, when the addition is finished at my home, the existing exterior walls will be finished with a sanded stucco texture. We have adobe block now, and she wants sanded stucco for its soft and elegant look. Stuccoing after the addition is complete will also give the appearance that the house and additions were all built simultaneously. But back to the main topic.

Depending on the quality of the material and the craftsmanship, sanded stucco has a number of different looks.
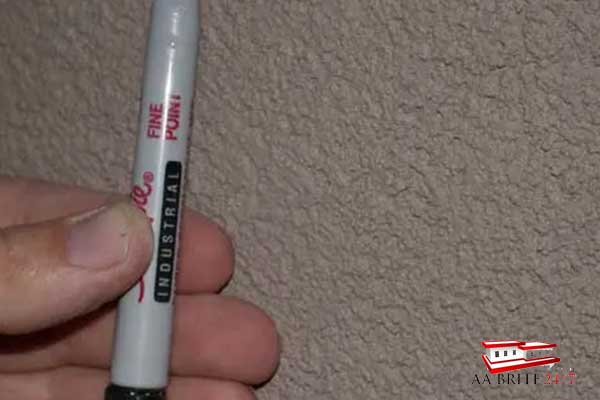
Sanded Stucco Example

This is as good as it gets. There are almost no air bubbles, and getting the paint to laminate and waterproof the surface is not a problem.
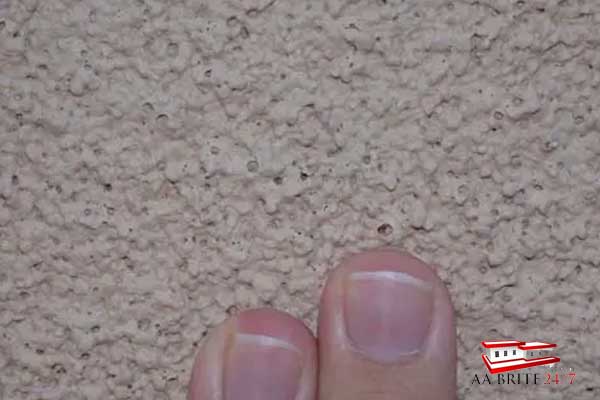
Sanded Stucco Example

The stucco has quite a few open pores, and this is an intermediate-level paint job as a result of the extra work required to minimize the shadowing. Shadowing is when you see darker colors of the open air pockets when looking at the stucco from the side.
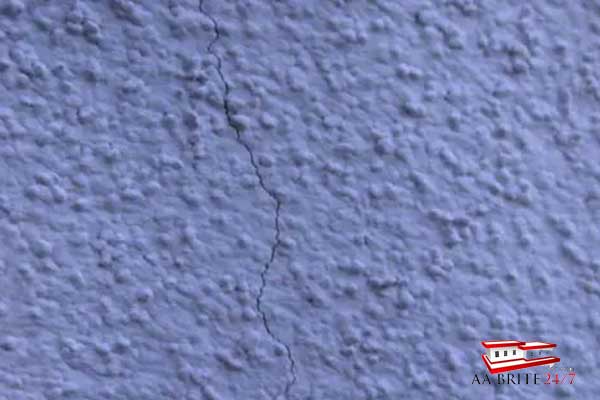
Cracked sanded stucco

An older stucco with small grains of sand. Notice how the texture is soft (not pointed or really lumpy). The crack is a minor problem and can be filled in without scarring prior to or during painting. Paint and caulk are similar materials, and by forcing paint down into narrow cracks, they will not return unless there is movement of the stucco.

3) Sprayed Cement Stucco Repair

For conversational purposes “sprayed cement stucco” is only concrete stucco which was left alone after spraying. Its texture could be compared to thousands upon thousands of miniature volcanoes which come to sharp points. This texture can be quickly sprayed on and its biggest advantage is the texture helps hide defects and variations of the concrete blocks it is usually sprayed over.

Advantages: Applies fast. Can be used to blend in new and old construction.

Disadvantages: Sharp texture. Texture varies in height and density over the building. Some patches are easy and some are difficult depending on the texture. Frequently has a lot of air bubbles. Being pure cement it also seems to crack quite a bit easier than stucco which was formulated for the purpose of covering a wall. This texture is usually really sharp and the form of the texture is a result of how thin or thick the concrete was when it was sprayed along with the distance from the wall and the air pressure. Frequently the density and height of the “mini volcanoes” changes significantly over the course of the building. This makes matching the texture difficult, and each repair might require a completely different look. The person doing the patching needs to mimic these “mini volcanoes” as closely as possible by controlling the variables. All of the sprayed concrete stucco homes I’ve seen have been older.
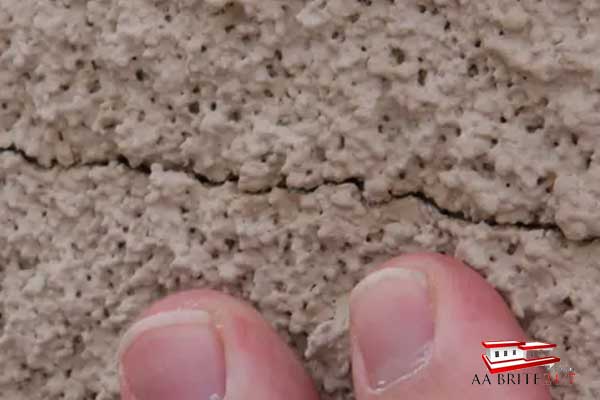
Sprayed Cement Stucco

4) Spanish Lace Stucco

If the stucco texture going on my home was my choice (it’s not), we would use Spanish lace for the numerous reasons shown below instead of picking Sanded.

Advantages: Cracks less than all other kinds. Is the best for hiding defects. Seems to be stronger than other types. A popular stucco for new construction. I don’t know the specific reason why but Spanish Lace is by far the most resistant to cracking. If a sanded and Spanish lace home are next to each other and were built at the same time the Spanish Lace will almost always have considerably less cracking on it after 10 years. I suspect the added depth of the texture makes it stronger, but this is only speculation. Cracks are also more difficult to see in the Spanish lace than in the sanded.

Disadvantages: Not many other than it is not considered to be as elegant looking as sanded or smooth.
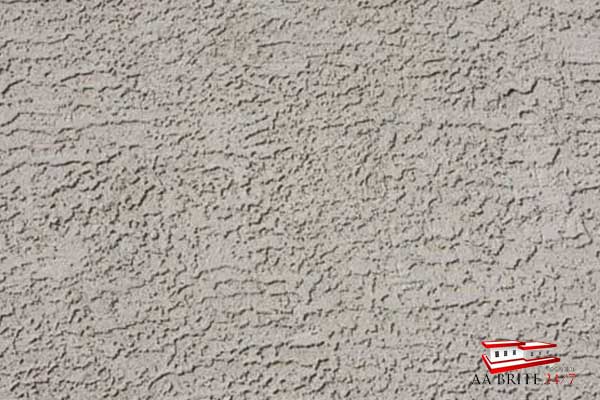
Spanish Lace Stucco

Spanish Lace is probably the most common type of stucco in the US for good reasons: 1) Its the easiest stucco to apply. By that I mean its the easiest for the builder to apply while at the same time having happy customers. 2) It can be touched up by less skilled workers. 3) Scaring and variations are less visible 4) It cracks considerably less than the other three types.
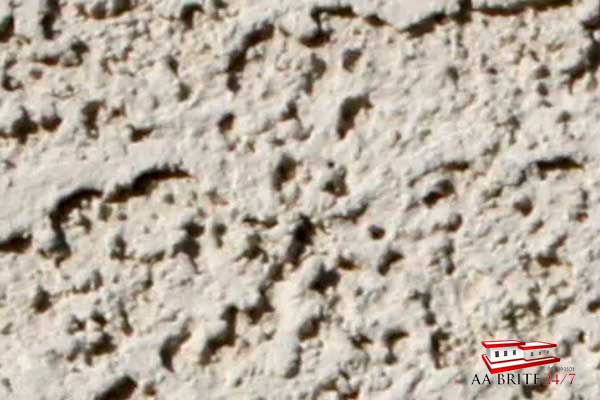
Spanish Lace Stucco Close-up

This image of Spanish lace stucco is at a higher magnification. Notice the lack of air bubbles. In my experience this is by far the most durable stucco texture. Its also the easiest to get patchwork to blend in.
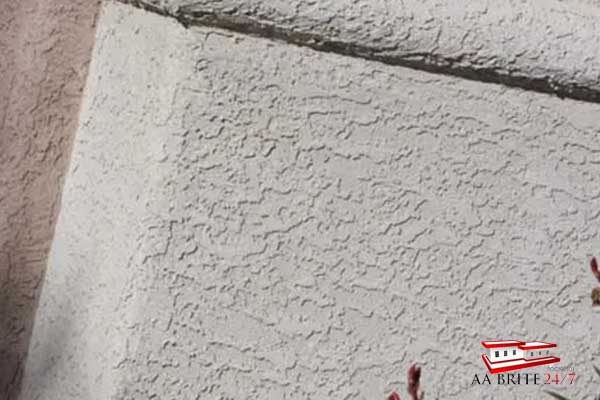
Spanish Lace Stucco with Air Bubbles

5) Tex Coating Stucco

Advantages: Applies fast. Can be sprayed on over wood and pipes.

Disadvantages: To my knowledge it hasn’t been used in the past 20 years. It flakes off in large chunks. New patches could eventually fall off since the material it’s applied to was not intended to be stuccoed.

“Tex” is our name for a common, but no longer sold or used elastomeric stuccoing paint with sand in it.

I don’t know what the material was called twenty years ago but the generic terms I’ve heard used in Tucson are “Tough Tex” and “Dex Coat” both of which are currently registered trade names of existing products, so for conversational purposes and to keep myself out of court, from here on this 15 year old sanded sprayed on plastic coating will simply be referred to as “Tex”.

Whatever Tex is or was called years ago, it’s actually an elastomeric material (plastic) similar to roof coating or really thick paint with sand mixed in it. This sandy plastic liquid was quickly sprayed from a special sprayer onto the exterior walls, fascia, trim, pipes and wires of a wood or block home. The texturing process was completed in one day by a painter. The Tex application process was much less intensive and faster than other stucco application methods since the material was more or less a paint, and applied as such. Until it went out of favor 15 or 20 years ago, Tex was put on fast, stuck to everything and looked good when new. Hurray for Tex….. Until you get to the disadvantages.
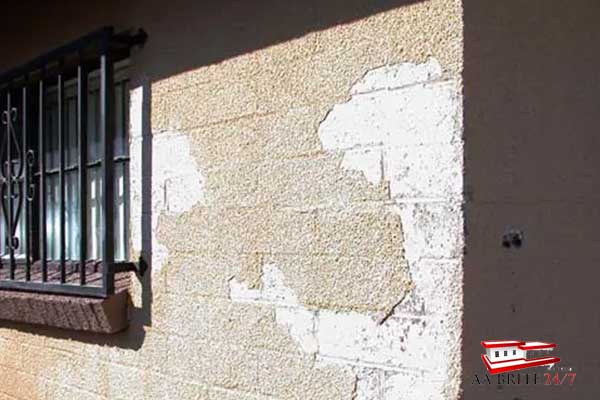
Tex Coating Stucco Example

A photo of a Tex coated home I was asked to bid on. This is typical of a home with a 20 year old Tex coating on it. At one time it looked great and now its turned into a giant headache for the homeowner.

Tex doesn’t get considerably thinner like paint as it ages, instead as the coating weathers and becomes stiffer and more brittle, it will loose its grip on the surface under it. Then large thick pieces start falling off. Getting a reasonable match of the texture is not terribly difficult.

The biggest short term problem is dealing with where the edge of the new patch meets the old tex. When the painter spreads out the new sanded compound, the plastic becomes double thick on the existing old portions of old tex near the edge of the patch, and “ringworm scars” are easily formed by this small area of double thick patch. These patches range from horrible looking to slightly noticeable depending on many variables.

The skill and patience of the person doing the patch has the largest effect how the patch looks when complete. In one exceptionally rare case I had a 70 year old woman show me a patch she did and it took me almost a minute to see the witness line. She worked in her spare time on the patch the size of a t-shirt. She told me it took her 30 hours to get the edges perfect. This shows it can be done if a person is willing to put the necessary man hours into it or to pay someone to do it. Most Tex patch jobs we’ve completed were actually “paint jobs” on rental homes, and patching the tex was secondary. Our rates have ranged from $1,200 to $4,000 on these jobs. The goal – so far – has always been to get the house patched and painted without spending much larger sums of money.

Most painting contractors shy away from tex repairs because the old tex continues to come off and they don’t want to be responsible for this. We not only repair tex, but we will warranty the work for two years. Before providing a quote I’ll carefully look at the tex and determine what the different avenues are for repair.

The following photos are from a job done almost two years ago. The first two photos were taken at the time we did the job and the last photo was taken recently.
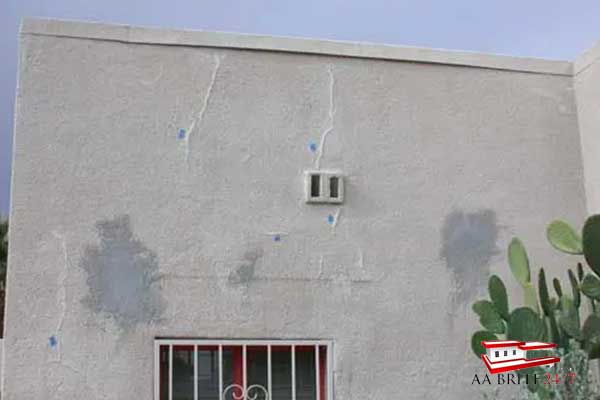
Tex Stucco Repair Before

A tex coated home with the first two patches applied. Notice the scars near the pieces of blue tape. These are previous repairs and the caulk lines are visibly raised up making scars.
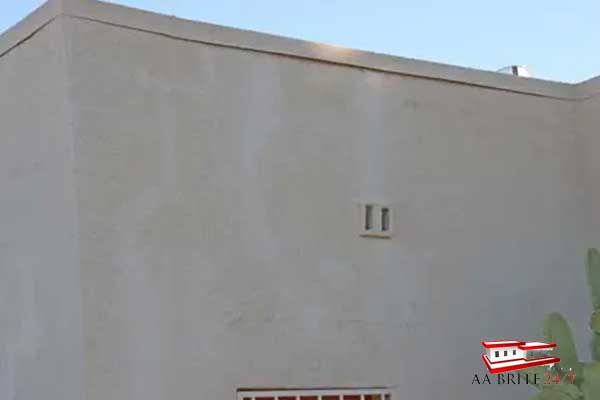
Tex Stucco Repair After

During the repair process. As you can see over 19 different spots were patched. This is typical with Tex coats.

The job is finished and some of the patch work is visible. I wish the patches were not visible at all, but the ringworm scarring talked about earlier is happening here. The ringworm scars could be removed with LARGE amounts of additional labor. The problem is for the number of scars needing to be patched it is cheaper and much more cost effective to re-stucco the home than it is to patch each spot perfectly.

In this case the owner wanted his home to look as good as possible for the least amount of money. Which translates into basic Tex patching and painting. Re-stuccoing this small home would cost approximately $10,000, plus the cost of priming and painting. We patched all around the home and painted it for about $1500. In other words – Patch and paint $1500 or Re-stucco and paint $11,500. Whats important to me as the owner is you as the client understand what the job will look like when we are finished BEFORE we start. If we are in agreement prior to starting then life is good for both of us.

6) Synthetic Sprayed Stucco

Advantages: Looks great and goes on fast. Is newer method.

Disadvantages: The very few that I’ve seen have lots of air bubbles when looked at closely, and when patched have to be painted four times. This is a close up view. From a distance it looks great and non-contractors wouldn’t normally notice the bubbles.

To my knowledge synthetic sprayed stuccos are produced by several different manufacturers. We don’t put it on new, so I’m unaware of all of the different properties or why certain types are used.

With regards to painting and patching, synthetic sprayed on stucco has an interesting set of characteristics.
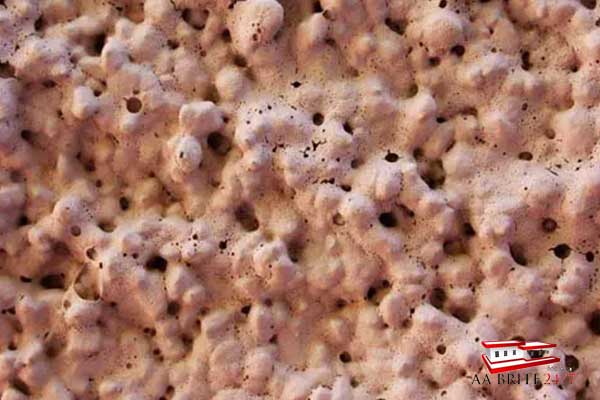
Synthetic Sprayed Stucco

Sad to say, but most new homes are painted with what we call a “piss coat” and with synthetic stucco like the kind shown here that’s a big deal. When a thin coat of paint is put on the stucco, it doesn’t fill up the pores or air voids. When stucco in this condition is patched, most of the voids are filled in and the texture looks different. The areas with a lot of pores and air voids will look darker and rougher since the shadows from the “caves” are showing.

If a area of sprayed on synthetic stucco is patched and painted it will look completely different than the surrounding area.
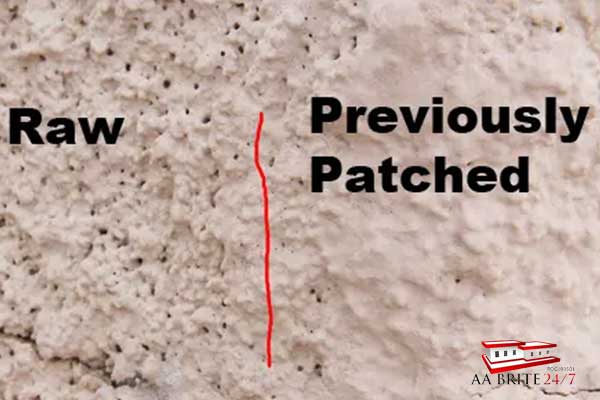
Raw versus Patched Stucco

Synthetic stucco can be patched and made to look nice, doing so requires painting the entire home with a heavy coat of paint after the patching is complete. Painting after patching eliminates the two looks on one home shown in the photo above.

Once a home has been re-painted and most of the pores are filled in, future patching is much easier to do.
AA Brite 24/7 Logo

Get a Quote for Roofing or Painting Today!
Call (520) 406-5900

Get a Free Estimate!

More Painting Tips


Continue reading

Painting in Desert Heat During the Summer


Painting in the Desert Heat During the Summer

Several times a month we receive calls from clients of ours or other contractors who are concerned about the extreme heat and how this will affect the paint as its applied.

The short answer is the heat is not a problem if the paint stays wet enough long enough for the area touching it to be painted while still wet.

In other words the paint is supposed to be applied as a wet film instead of being applied in two foot wide stripes which dry before more paint is added.

A small amount of water added to the paint will keep it we long enough for an area to be painted as one film instead of multiple dry stripes.

AA Brite 24/7 Logo

Get a Quote for Roofing or Painting Today!
Call (520) 406-5900

Get a Free Estimate!

More Painting Information


Continue reading

The 12 Most Common Roof Problems in Tucson


The Flat Roof Repair and Coating Page explains the patching and coating process in detail. The page your on now and the Flat Roof Repair and Coating page together tell you what the roofs are, how they work, what their problems are and how they are repaired and coated.
I personally own a house with a flat cool coated roof, and my office building in my back yard also has a flat roof on it. So not only do I work on them I also live with them. According to some people this is a great thing and others think its terrible. More on that later.

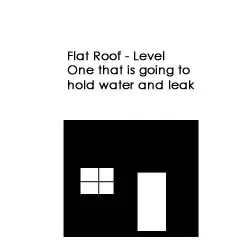
First of all, the term “flat roof” is somewhat misleading. Many people think of “flat” as being the same thing as level.

What is a Flat Roof?

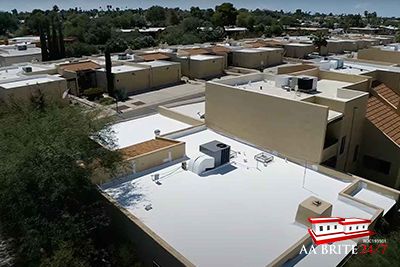
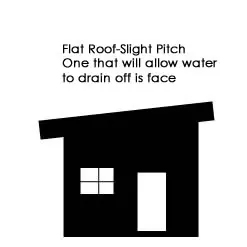
A flat roof should ALWAYS have a little bit of slant to allow for water-drain off. Think of a flat pool table where the balls always roll to one end because the table is not level. At first glance many flat roofs will appear to be level, but upon closer inspection it can be seen they are built with a slight rise for drainage. This is important to avoid the confusion I often see with regards to clients who don’t know what to call their style of roof. Understanding this is important to avoid the confusion clients often experience in trying to describe their style of roof.

  • Flat Level Roof

  • Flat Roof with Elevation

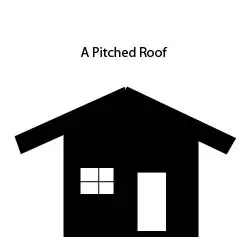
What is a Pitched Roof?

Pitched Roof

A pitched roof is typically considered to be a shingle or tile roof. The easiest way to communicate what your roof type is to call it one of the three: “Flat, Shingle or Tile”. The types of problems presented below might give some the impression that flat roofs are not desirable. In the Southwest and other arid climates, flat roofs are extremely desirable for several reasons which are illustrated below.

Why would I want a Flat Roof?

I grew up in the Midwest. As such I lived in an area with lots of snow and cold winters. Shingle roofs were common and due to the weather the roofs needed to be replaced every 15 years or so. It was commonly known and expected. Every few years or so the region would experience severe storms or even small tornadoes. It was normal for people to replace a few missing or damaged shingles. In general the roofs held up well and drained off the water like they were supposed to.
Fast forward twenty years. I, Robert Anderson am now living in Arizona! There are not many houses with shingle roofs. Why? Shingle roofs soak up a TREMENDOUS amount of heat and turn a Tucson attic into an oven in the summer time. This is NOT energy efficient and people living in the southwest figured this out a long time ago.

A reflective roof coating was the answer THEN and NOW. Back then the reflective coating was silver. The logic was to have the roof act like a mirror and reflect the heat. This was superior to shingles, however not by much. The silver coating reflected some of the visible light but the UV light was still soaked up in the coating and the roof heated up significantly. The heat then shortened the life of the roofing materials.

As technology and knowledge grew, white-cool coating became the solution. This coating reflected a great deal more of the UV and when clean would stay within a few degrees of the air temperature. If it was 115 degrees outside the clean white roof would be 115 degrees. NOW people were excited! I have measured this (the heat not the excitement) personally. So the figures I use above are not based on theory but my actual experience. A shingle roof easily reaches 150 degrees under hot the summer sun. An old style silver roof would frequently hit 140 degrees whereas a cool-coated white roof would be more like 115 degrees. When the roof on a 2,000 square foot house is reduced in temperature by 25 degrees for months at a time there is going to be significant savings on the air conditioner electric bill.

From a maintenance point of view there are many advantages to owning a cool-coated roof. First of all finding a leak on a shingle or tile roof can be troublesome and time consuming. Tile roof leak problems are typically dealt with on a larger scale. If the corner is leaking it is common for forty square feet of tile to be removed to identify the problem. Shingle roofs typically leak at the edges or where two roof sections come together and water drains in a “V” shaped section. When the shingles are replaced they typically do not match and the roof looks patched. The choice is easy. Live in a house with a white cool coated flat roof. If there is an issue I can almost always see where it is and how to fix it. Annual inspections are also simple and quick. It is much more cost effective and easy to repair.

What are the advantages of White Cool Coated Roofs?

White cool coated roofs have significant advantages. Having worked on the three different types of roofs here in Tucson I personally chose to purchase a home with a flat roof. My choice was intentional.

Now we have reviewed the positive aspects of flat roofs, but you are probably not viewing this page because your roof is in great shape but because you have a problem. Shown below various problems associated with flat roofs.

Common Flat Roof Problems

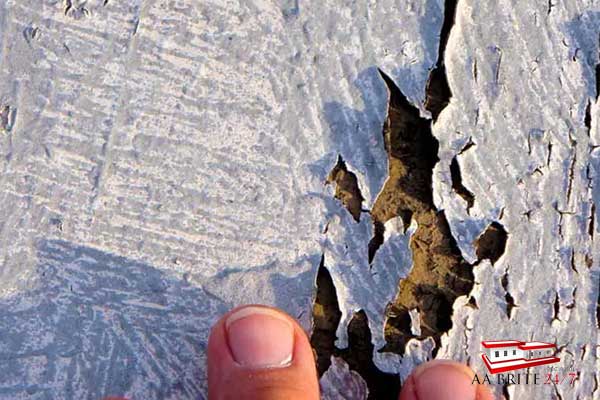
  • Roof Sores

    Roof Sores

    The most common flat cool coated roof problem. This happens with age. Heat from the sun causes the roof to expand during the day, and at night as the roof cools it shrinks. This is called a heat cycle. Over the years not only is the roof experiencing hundreds of heat cycles, the coating is also slowly drying out and getting brittle. So basically the coating is always moving and its getting dry and more brittle. Eventually it cracks and splits.

  • Roof Issues Scupper Leaks

    Scupper Leaks

    The most common problem we get called for. Sores are more common than scupper leaks, but don’t typically let a lot of water into the house in a short period of time. A leaky scupper is like having a crack on your bath tub drain, and the water is leaking onto your bathroom floor. It gets your attention. Two reasons why scupper leaks are such a big deal. First they are usually the lowest point on your roof so they have the maximum amount of water passing over them. Second, they are built with at least 4 different kinds of material and each material expands and contracts at a different speed as it goes through the daily heat cycle from the sun. All these different materials moving at different speeds cause them to crack sooner than the rest of the roof. Link to Scupper Page where there is 15 or so more pictures of scupper issues.

    Read more

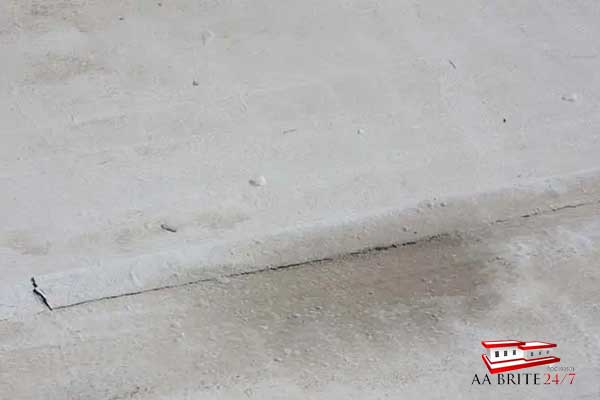
  • Roof Issues Split Seams

    Split Seams

    Another common problem I see several times a week are split seams. Sores are when the material drys out and cracks in random areas. Splits along the seams occur for the same reasons as sores, which are drying of the coating combined with physical movement. The difference being there is typically ALOT more movement at the edge of the material (seams) and the movement is in the same spot every day. A thick coating well applied will typically develop splits at the seams before it starts to get sores. The remedy for this is to put fiber tape and patch compound on it prior to re-coating.

    Read more

  • Roof Issues Ponding

    Roof Ponding

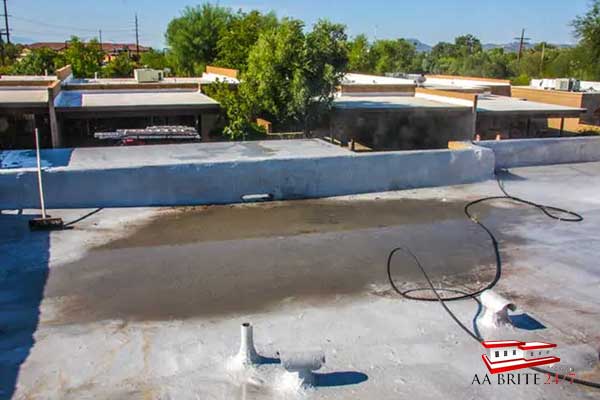
    The most difficult of all flat roof problems is ponding. Ponding is a result of a poor design or roof installation. The drain is supposed to be lower than the rest of the roof, not an inch higher. Unfortunately this is a fairly common problem in Tucson. Anti-ponding material (filler) can be used; however, if too much is used, a new pond forms behind it. Areas with ponding age faster than other parts of the roof. In general, we are very conservative when we treat areas with anti-ponding material since using a too much, even a little too much compound, will cause a new pond to form.

    Read more

  • Roof Issues Wrinkling

    Roof Wrinkles

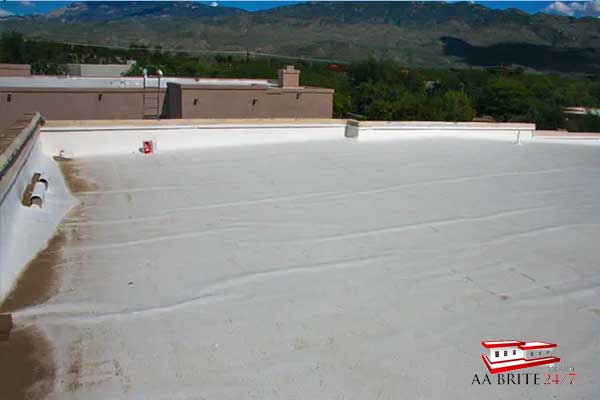
    Wrinkles are not as common as sores, split seams and ponds but I do see them about once a month. My belief is wrinkles are caused by not enough tar (glue) being used when the tar paper or sheeting was put on top of the plywood roof as the house was built. The tar paper is not supposed to sit on the plywood roof decking , its supposed to be glued to the decking. When not enough tar is used, the paper has some wiggle room.

    For lack of a better way of explaining this, the loose area now accepts any growth in the paper. I may not know the exact reasons for what causes it, but there are several basic options once wrinkles have happened. In most cases from a cost benefit point of view ripping off the roof and getting a new one installed is overkill. There are several other options. The first, if the wrinkles are not cracking down the center is to leave them alone. If the underlying paper or fabric is thick and in good shape the wrinkles can be there for years without causing issues. This is assuming no one is stepping on them as this will cause them to crack. The second choice is to put fiber tape or polyester fabric on the wrinkles along with patch compound and coating. Lastly the wrinkles can be cut out and new fabric or papers patches can then be put on them along with cool coating. I used to believe the best method was to cut them out and fabric over them. Years of experience have caused me to change my mind. Cutting them out and patching is more work than it sounds like, i.e. more expensive than necessary. I now believe the most cost effective way for homeowners to deal with them is to run a piece of fiber tape down the ridgeline (highest spot) of the wrinkle and to coat over it with cool coat. I could write quite a bit more about wrinkles but its easiest to say its basically a manufacturing defect which you’re dealing with after the fact so there are no great answers.

  • Roof Issues Blistering

    Roof Blistering

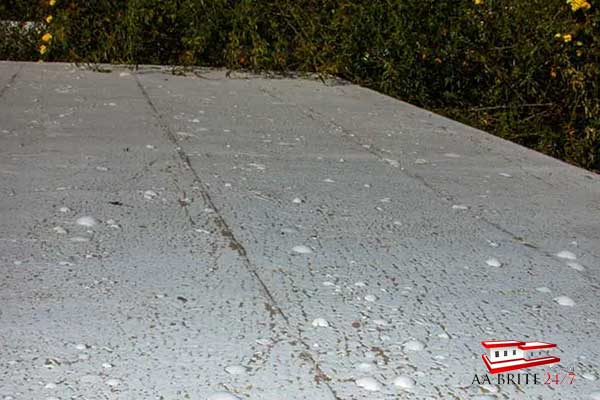
    Blistering is not nearly as common as it used to be because of the advances in roof-coating materials. One cause is that the roof was damp when the coating applied. The newer formulations of coatings are not nearly as susceptible to this problem. If a roof has not shown any problems for years and then starts to blister, and that possible reason is that water is somehow getting into the roof. The blister is created by water vapor as it tries to evaporate. If blisters are grouped together in a specific area, then there is probably a leak nearby. A blister will eventually break open after a number of years of weathering.

    Read more

  • Roof Issues Flashing Lifting

    Flashing Lifting

    Flashing Lifting is also caused by inferior workmanship. A metal flashing needs to have fiber tape put on it at the joint or it will always crack out. This particular photo is one of the worst examples of workmanship I have seen in recent years.

  • Roof Problems Emulsifier Issues

    Emulsifier Issues

    Emulsifier is a roofing product that dries oil out of the top layer of tar so water based coatings will stick to it. Was the General Contractor or Roofer in a hurry when the house was built? If so, there are emulsifier issues. Ideally, the contractor or roofer will allow two weeks to pass before putting the emulsifier on the tar, and then the cool coating over it. Obviously, if no emulsifier was used on top of the new tar, the cool coat failed to stick to the roof. Ironically, if unemulsified tar underneath the cool coating is exposed to the sun and elements for a year or more, the oils in the tar will dry out naturally. The area can then be patched or cool coated without first emulsifying it and waiting the two weeks for a cure out. Poor construction practices are a major cause of roof coating failure.

    Read more

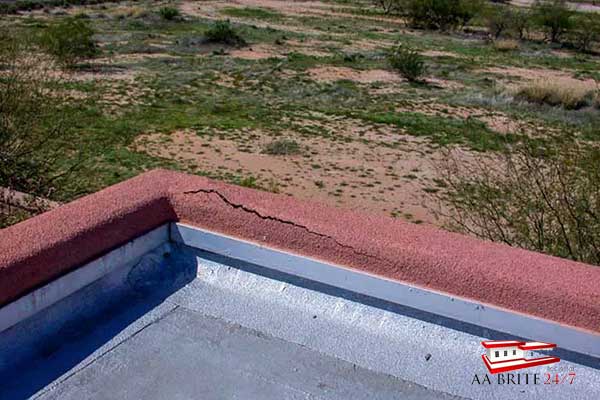
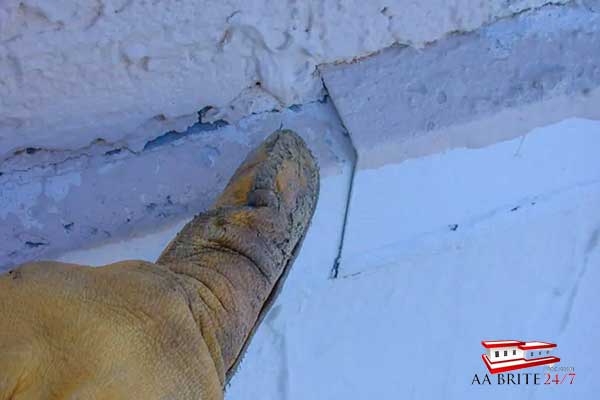
  • Roof Issues Parapet Leakage

    Parapet Leakage

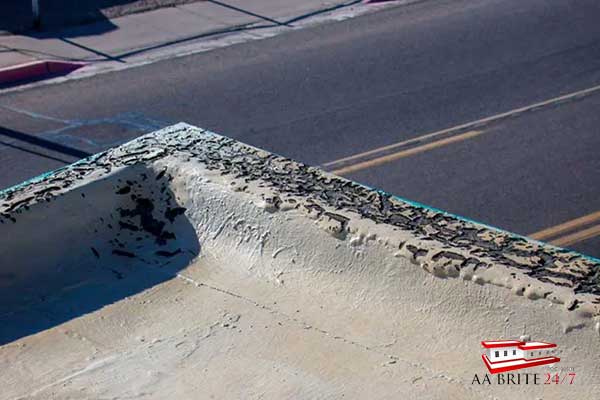
     Parapet leakage is sometimes a natural part of the aging process and other times it is a construction quality issue. Almost all of the homes in this particular subdivision have these large (and much larger) cracks. The photo to the right shows a construction defect; but, the good news is it can be repaired.     There is a large page on this site with lots of information regarding parapet patching, repairs and coating.

  • Roof Issues Leaking Flashing

    Leaking Flashing

    Aging and movement will cause leaks here over time. They can be easily sealed.

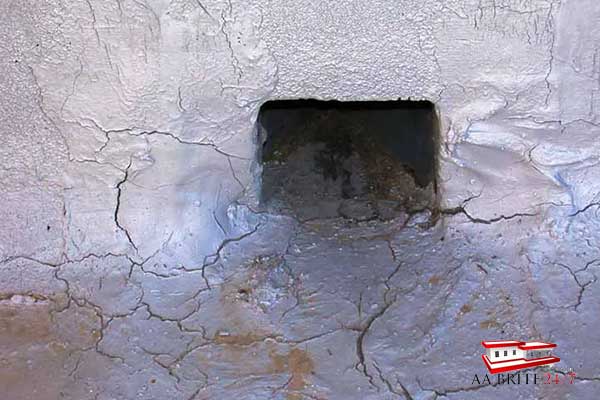
  • Roof Issues Cracked Penetrations

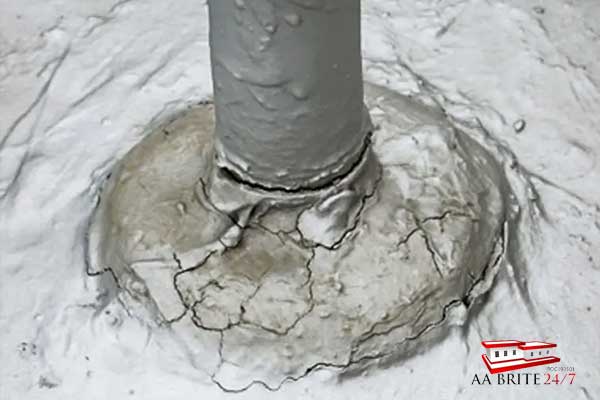
    Cracked Penetrations (vent pipes)

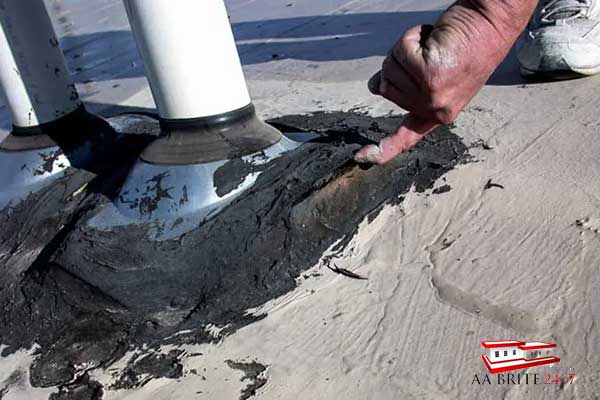
    There is no way to prevent vent pipes from cracking the roof coating. The roof expands during the day from heating up in the sun, and the vent pipes do not move, causing a crack to develop in the sealant. Fiber tape and sealer over the crack will prevent leaking for approximately four to seven years.

  • Roof Issues Leaking Skylights

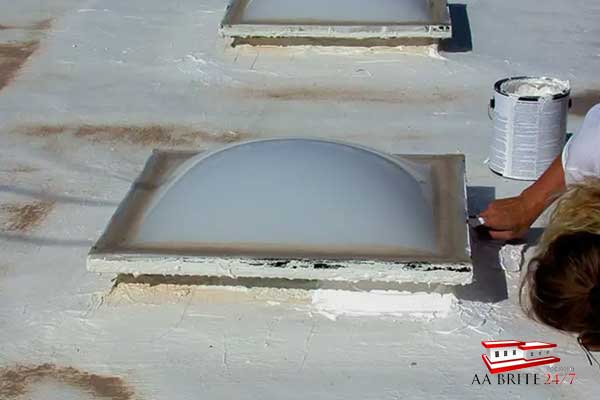
    Leaking Skylights

    The skylight shown is not exactly a glamorous picture but you get the idea. Renee is patching a leaking skylight. This was a patch only and not a full roof re-coat. There are a couple of places where skylights typically start to leak. These problems are not usually difficult to repair for the trained eye. As a side note. Notice the homeowner applied OLD gray silicon caulk around the edge of the plastic domed lens. From a professional point of view this is a no-no as the water is supposed to weep around the edge of the metal frame and drip out the bottom.

If caught in time, flat roof repairs can be relatively inexpensive and do not always require a re-coat. We at AA Brite 24/7 recommend that you have your flat roof inspected every four (4) years by a trained professional. We are always available to serve your flat roof repair and emergency repair needs. A little bit of preventative maintenance goes a long way.

If you haven’t looked at it yet you are now prepped for the Flat Roof Repair and Coating page

AA Brite 24/7 Logo

Get a Quote for Roofing or Painting Today!
Call (520) 406-5900

Get a Free Estimate!

More Roof Problems You May Have


Continue reading

Types of Paint Finishes for Tucson Homes


Paint comes in a confusing number of types and styles and is ranked differently in quality by painting organizations than it is by consumer reports. I’m personally a little more interested than other people regarding the quality of the paints, not only from a professional point of view, but because my area of specialty for my Masters Degree was plastics.

The charts below show only my personal opinions as to the quality of the paints in order of quality from highest (at the top of the charts) to the lowest. If your a lawyer or a paint rep for one of these manufactures – again the chart is my opinion of quality of the paint for use in Tucson Arizona.

To consumers and potential clients if you do too much reading from the various paint manufactures web sites and consumer reports you are going to end up more confused instead of less. Each paint manufacture thinks their paint is the very best and can give you reasons why their less expensive paint is better than the other guys premium paint.

What it boils down to is experience with these paints in this environment. Tucson is usually hot, sunny and dry. The requirements for a great paint here are different than in Washington state – where UV protection is not all that important but resistance to moisture is.

Exterior Paints Typically Used in Tucson

The Yellow Row is the “Ultra Premium” of the painting world. Before saying that’s the paint I have to have on my house, think about cars for a second. A new Bugatti Veyron lists for 1.7 million dollars. The Ultra Premium paints are not frequently used for a similar reason, they typically cost a great deal more than a high grade premium – which is still a great paint (think Toyota Corolla or Honda Accord).

In other words an Ultra Premium paint can easily add $800 to the cost of painting a house.

If you want to skip most of the detail and just the see products based on my personal experience which are great for painting in Tucson then look for the GREEN cells in the tables that follow.’

Typically Used Exterior Paints


Dunn Edwards

Sherwin Williams

PPG

Primers

Ultra Grip Loxon stucco primer Permacrete
  E-Z Prime Summit Primer Seal Grip
  Eff Stop*    
       

Flat

  Duration Manner Hall Timeless
  Evershield Super Paint Manner Hall
  SpartsShield ** A-100 Pitcril Plus
  Enduracoat Summit Pitcril
  Versaflat Sher Clad Speed Hide
       

Satin

  Duration Manner Hall Timeless
  Enduracrill Super Paint Sunproof
  Sparta Sheen A-100 Pitcryl Plus
  Versa Satin Summit Speed Hide
       

Eggshell

     
  Perma Shell   Manner Hall
  Sparts Shell    
       

Semigloss

  Duration Manner Hall Timeless
  Perma Sheen Super Paint Manner Hall
  Sparta Glow A-100 Sunproof
  Versa Glow   Speed Hide
       

Gloss

  Duration  
  Perma Gloss Super Paint Manner Hall
  Sparta Gloss A-100 Speed Hide
Copyright 2009 AA Brite 24/7 Unauthorized redistribution is prohibited

* Eff Stop is for new stucco which has a high Ph-value. **SpartaShield is technically a slightly lower quality paint than Evershield. BUT it is a MUCH BETTER paint for sanded stucco. The stucco repair section covers the reasons in detail.

Interior Paints Typically Used in Tucson

Listed below is another chart showing the types of paints used locally. Yellow is “Ultra Premium” and green is the premium paint we typically use. The ratings are my opinion only. If you would like to use the Ultra Premium, we typically just add the extra material cost to the price of the job.

Typically Used Exterior Paints


Dunn Edwards

Sherwin Williams

PPG

Primers

Ultra Grip Loxon stucco primer Permacrete
  E-Z Prime Summit Primer Seal Grip
  Eff Stop*    
       

Flat

  Duration Manner Hall Timeless
  Evershield Super Paint Manner Hall
  SpartsShield ** A-100 Pitcril Plus
  Enduracoat Summit Pitcril
  Versaflat Sher Clad Speed Hide
       

Satin

  Duration Manner Hall Timeless
  Enduracrill Super Paint Sunproof
  Sparta Sheen A-100 Pitcryl Plus
  Versa Satin Summit Speed Hide
       

Eggshell

     
  Perma Shell   Manner Hall
  Sparts Shell    
       

Semigloss

  Duration Manner Hall Timeless
  Perma Sheen Super Paint Manner Hall
  Sparta Glow A-100 Sunproof
  Versa Glow   Speed Hide
       

Gloss

  Duration  
  Perma Gloss Super Paint Manner Hall
  Sparta Gloss A-100 Speed Hide
Copyright 2009 AA Brite 24/7 Unauthorized redistribution is prohibited

AA Brite 24/7 Logo

Get a Quote for Roofing or Painting Today!
Call (520) 406-5900

Get a Free Estimate!

More Painting Tips


Continue reading

  • 1
  • 2